
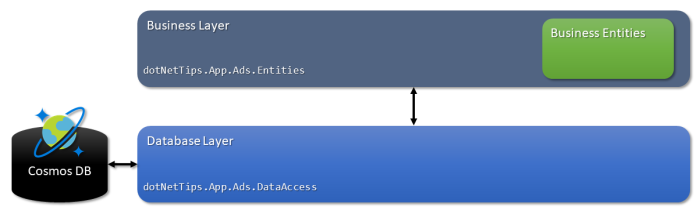
In the second article in this series, I laid out the architecture and design for this cloud solution. Now it’s finally time to get coding! In this article, I will discuss how I designed the data layer using Azure Cosmos DB. To keep a separation of concerns, I will also talk about the business entities which are part of the business layer.
This article was originally published in December of 2018. Creating a Cosmos DB database on the Azure Portal has radically changed. Accessing data in your database has also changed. This update contains those changes and more.
Ever since Entity Framework was released, I put the entities and classes to access the data in separate projects. The reason I do this is so that they can be easily reused by any assembly in the solution or other solutions. This way, client apps don’t need the data layer (nor should they) since all external data access should go through the communication layer (discussed in this article).
This is the first time I have used Cosmos DB or any other document database framework. Let’s get going. If you haven’t used Cosmos DB before, this is the description of it from Microsoft:
Azure Cosmos DB is a fully-managed database service with turnkey global distribution and transparent multi-master replication. Get single-digit millisecond read and write latencies at the 99th percentile, automatic and elastic scaling of throughput and storage worldwide, 99.999-percent high availability, and five well-defined consistency choices—all backed by industry-leading comprehensive SLAs.
If you have never used a document database before, stop and go to Before You Start Using Cosmos DB section at the end of this article.
Setting Up Cosmos DB
Creating a Cosmos DB account and database is easy and all of it can be down via the Azure Portal as you will see. It can also be done via code.
Step 1: Create an Azure Cosmos DB Account
To get started, on the Azure Portal select Create a Resource from the top-left menu. Then select Azure Cosmos DB. You will see the screen below.
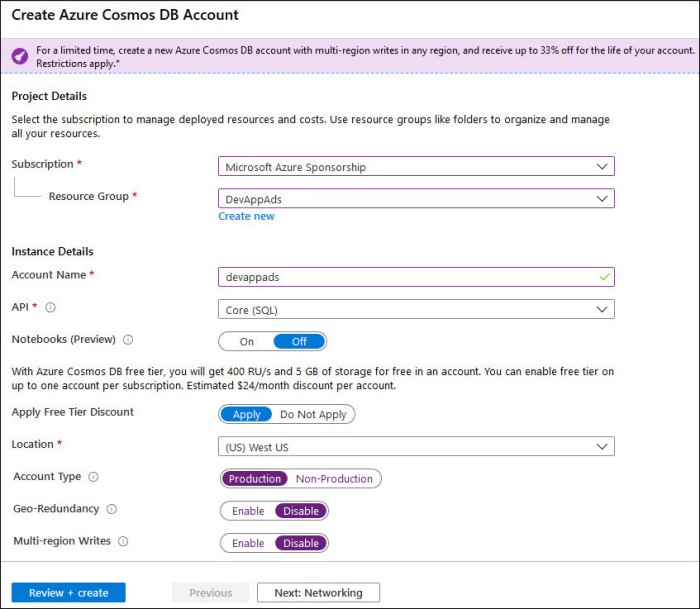
First, under Project Details, select the Subscription you would like to use for the account. Then I created a new resource group called DevAppAds. For Instance Details, I created an account name called devappads (name must be all lower case). For the API, I choose Core (SQL). Other API choices are Azure Cosmos DB for MongoDB API, Cassandra, Azure Table or Gremlin (graph). For Location, I chose (US) West US. For Account Type, I chose Production and disabled Geo-Redundancy and Multi-region Writes since that can increase the minimum monthly cost.
When finished, click on Next: Networking.
Step 2: Setting Up Networking
Next, the network needs to be set up for the account.
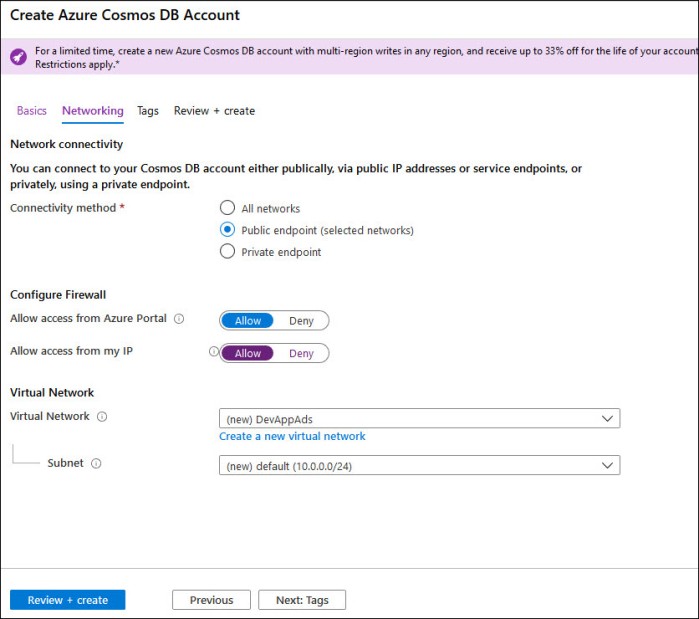
For networking, I kept most of the default values. The only ones I changed were Allow access from my IP and created a new virtual network. When done, select Review + create.
Step 3: Review & Create
After clicking on Review + create, you will then be presented with the screen below. Creating a Cosmos DB account can take a while and now this screen gives an estimate. For this setup, it’s telling me around 10 minutes.
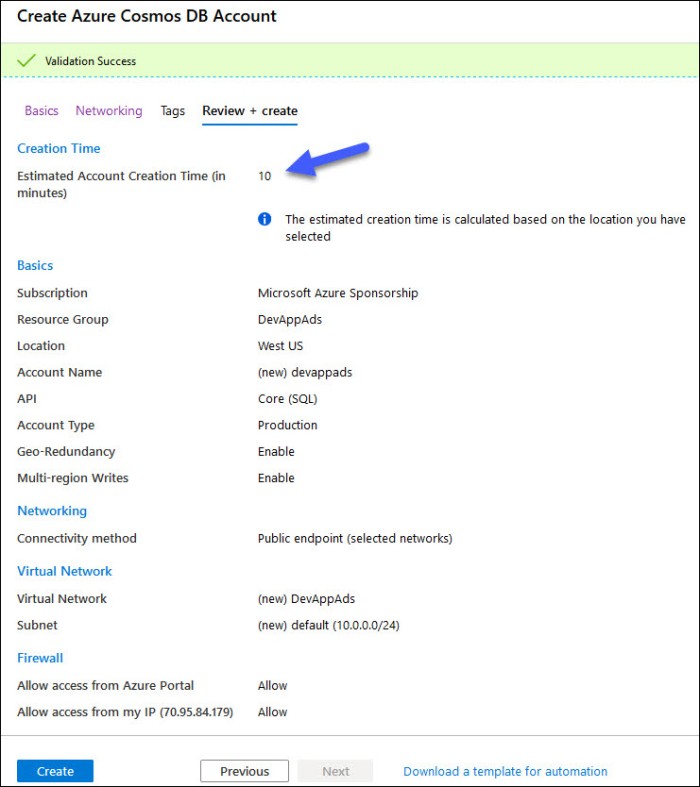
 Review the setup and if you are happy with everything, click Create. Then go get some coffee or grab lunch. My estimate was 10 minutes, but actual creation took around 24 minutes, on a weekend, during the COVID-19 pandemic!
After the account is created, I pin the account to my dashboard for easy access.
Creating the Database
The next step is to create a database. Go to the Azure Cosmos DB Account, then navigate to the Data Explorer, then click on New Container and then New Database. You will see the screen below.
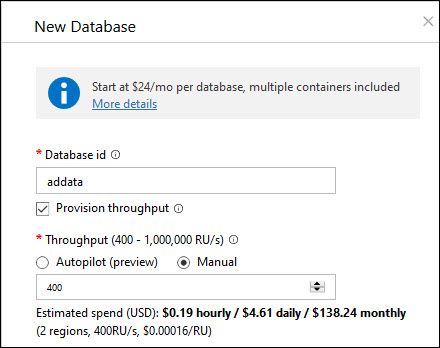
As you can see, this screen now shows you an estimate of the cost of the database. Previously you would have to use the Azure Calculator for Cosmos DB. For my database I configured the following values:
- Database ID = addata: The ad document will be the main document for this database, so I just added “data” to the end.
I kept the rest of the values as their defaults. I’d like to note that the minimum number of RU/s you can configure is 400. RU stands for request units for Cosmos DB and it represents the availability of your database, CPU, memory & IO resources and how everything is charged to your Azure account. Here is the description of RU/s from the docs.microsoft.com site.
With Azure Cosmos DB, you pay for the throughput you provision and the storage you consume on an hourly basis. Throughput must be provisioned to ensure that sufficient system resources are available for your Azure Cosmos database at all times. You need enough resources to meet or exceed the Azure Cosmos DB SLAs.
The cost of all database operations is normalized by Azure Cosmos DB and is expressed by Request Units (or RUs, for short). You can think of RUs per second as the currency for throughput. RUs per second is a rate-based currency. It abstracts the system resources such as CPU, IOPS, and memory that are required to perform the database operations supported by Azure Cosmos DB.
Unlike the cost of Azure SQL, which is very cheap and is based on usage and storage, Cosmos DB will always have a minimum monthly cost unless you choose the new free tier. Make sure you keep an eye on the cost and adjust accordingly. The free tier allows you to host a database under 5GB!
Creating a Container
Documents need to be added to a container in Cosmos DB and is easy to do. Containers not only contains documents but also represents the unit of scalability for the throughput with data stored on one or more partitions. Creating a container can be done via code, but I will show how to do it right from the portal.
Once the database is created, go to its summary and click on Add Container. Alternatively, you can go to the Data Explorer for the account. You will be presented with the setup screen as shown below.
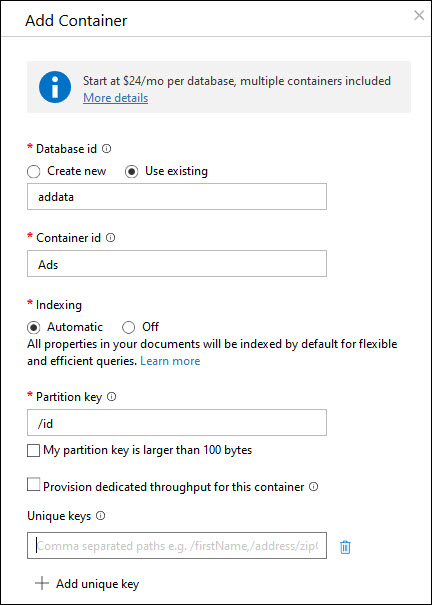
I configured the following values:
- Database id = Create a new database id or use an existing one. I selected addata.
- Container id = Ads
- Partition key = /id: This is the way I am partitioning the documents based on the document id. Choose your partition keys carefully because they cannot be changed once the container is created.
Partition keys are how Cosmos DB physically separates data and it does affect performance. Here is a quick description from Microsoft.
Azure Cosmos DB uses partitioning to scale individual containers in a database to meet the performance needs of your application. In partitioning, the items in a container are divided into distinct subsets called logical partitions. Logical partitions are formed based on the value of a partition key that is associated with each item in a container. All items in a logical partition have the same partition key value.
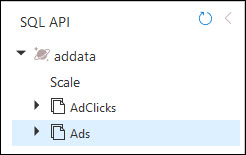 After selecting Ok, the container will be created and it’s time to start adding documents. I also added an AdClicks container.
Documents can be added and edited right from the portal, but we will do it via code coming up. But first, let’s talk about the business entities.
Business Entities
The data that I need to be stored for this project is simple and currently, I have identified two main entities. All of these entities are in the project dotNetTips.App.Ads.Entities.
Base Entity
Since I dislike code duplication, like the plague, I created a base entity for Ad and AdClick to reuse the Id property. I can easily add more later, for example, I might add a deleted property. I’d like to point out that Cosmos DB always adds an Id property to every document. Id is typed as a string, but the value is a GUID.
public class Entity
{
    private string _id;

    [JsonProperty(PropertyName = "id", Order = 1)]
    public string Id
    {
        get
        {
            if (string.IsNullOrEmpty(_id))
            {
                _id = Guid.NewGuid();
            }
            return _id;
        }
        set
        {
            _id = value;
        }
    }
}
Since the naming standards for JSON is different from .NET I am using the JsonProperty attribute to fix that.
Ad Entity
This is the main entity that stores the info for an ad.
public class Ad : Entity
{
    [JsonProperty(PropertyName = "app", Required = Required.Always)]
    public App App { get; set; }

    [JsonProperty(PropertyName = "enabled", Required = Required.Default)]
    public bool Enabled { get; set; }

    [JsonProperty(PropertyName = "image", Required = Required.Always)]
    public Uri Image { get; set; }

    [JsonProperty(PropertyName = "isoLanguage", Required = Required.Always)]
    public string ISOLanguage { get; set; }

    [JsonProperty(PropertyName = "link", Required = Required.Always)]
    public string Link { get; set; }

    [JsonProperty(PropertyName = "message", Required = Required.Always)]
    public string Message { get; set; }

    [JsonProperty(PropertyName = "schedule", Required = Required.AllowNull)]
    public Schedule Schedule { get; set; }

    [JsonProperty(PropertyName = "title", Required = Required.Always)]
    public string Title { get; set; }
}
Here is the explanation of each property.
- App: Is the internal id (not the database id) of the app. Since currently I only have one app, the value is 1 (since it comes from the App enumeration. Furthermore, an app id of 0 means that it applies to all apps.
- Enabled: This Boolean property allows me to quickly turn on and off an ad.
- Image: This stores the Uri to the image to use for the ad.
- ISOLanguage: This will store the three-letter ISO language that the ad is for. Currently, all the ads will be in English, but that could change in the future.
- Link: This is the URL that the user will click on to find out more information about the ad.
- Message: This will be the message that will be displayed to the user for them to click on.
- Schedule: This is a property that holds the start and end dates of a scheduled ad. This is not required.
- Title: This is the title for the ad that will be displayed to view and edit ads via the management web site.
I might add more properties later, which is easy to do with Cosmos DB, but for now, this is all I need.
When the Ad document is inserted into Cosmos DB, this is what it looks like:
{
  "app": 0,
  "image": "https://appads.file.core.windows.net/images/logo.jpg",
  "isoLanguage": "eng",
  "link": "http://bit.ly/dotnetdaverocks",
  "message": "Check out one of my conference sessions live & in person!",
  "schedule": null,
  "title": "Rock The World",
  "enabled": true,
  "id": "4baca6f3-8446-4729-b587-5e015f8cf44d",
  "_rid": "sFsoAMm-+niChB4AAAAA==",
  "_self": "dbs/sFsoAA==/colls/sFsoAMm-+ng=/docs/sFsoAMm-+niChB4AAAAA==/",
  "_etag": "\"07005af6-0000-0700-0000-5e8500880077\"",
  "_attachments": "attachments/",
  "_ts": 1585774799
}
As you can see, data in Cosmos DB is stored as JSON. The Id is automatically added by Cosmos DB along with the data properties that start with an underscore.
AdClick Entity
Each time a user clicks on an ad, that event will be sent to Cosmos DB, via a Azure Queue (discussed in this article). This entity properties are:
public class AdClick : Entity
{
    [JsonProperty(PropertyName = "adId", Required = Required.Always)]
    public string AdId { get; set; }

    [JsonProperty(PropertyName = "clickedOn", Required = Required.Always)]
    public DateTimeOffset ClickedOn { get; set; }

    [JsonProperty(PropertyName = "isoLanguage", Required = Required.Always)]
    public string ISOLanguage { get; set; }

    [JsonProperty(PropertyName = "isoRegion", Required = Required.Always)]
    public string ISORegion { get; set; }
}
Here is the explanation of each property.
- AdId: This is the identifier to the ad the user clicked on. This will be used later to generate reports for the activity for each ad.
- ClickedOn: This is the UTC date and time on when the user clicked on the ad.
- ISOLanguage: This is the ISO language setting from the user’s computer.
- ISORegion: This is the ISO region setting from the user’s computer.
Here is what the JSON document in Cosmos DB looks like for this entity:
{
  "adId": "da180660-0318-48b9-81be-7ccd967a24e0",
  "clickedOn": "2020-01-05T20:26:55.8470841+00:00",
  "isoLanguage": "eng",
  "isoRegion": "USA",
  "id": "62abebb3-0103-48ec-952d-583c7ff99c15",
  "_rid": "sFsoAPenqbCBhB4ACBAA==",
  "_self": "dbs/sFsoAA==/colls/sFsoAPenqbA=/docs/sFsoAPenqbCBhB4ACBAA==/",
  "_etag": "\"1d00d9aa-0000-0700-1100-5e7f79671230\"",
  "_attachments": "attachments/",
  "_ts": 1595412355
}
Data Layer
Next, I will describe how I coded the data layer that can be found in the dotNetTips.App.Ads.DataAccess project. Before I do, I will again state that, for many reasons, I try to avoid writing duplicate code and this layer is no different. In many of my conference sessions I state that 90% of all the code you write should be in reusable DLL’s. Once this project is completed, I have plans to move some of the base classes I’m writing for this solution into my .NET Standard open-source projects.
DataContext<T>
This is the abstract base class for the other data context classes that I will discuss next. I will go over the major methods of this class.
Constructor
The parameters in this constructor, as in most I write, is the data that the class needs to operate correctly. The description of the parameters is below:
- endpointUrl: This is the location of the database in Azure. For example, https://devappads.documents.azure.com:443/.
- databaseId: This is the unique id of the database. For example, addata.
- masterKey: This is the security key (primary key or secondary key in the portal) needed to connect to the database. For example, NjpQtPF7s8zj9JAc2dpMMMVUqjAdpmialuCCu1vhw==
To obtain the URI and the keys, click on Keys in the portal and you will see a screen like this one.
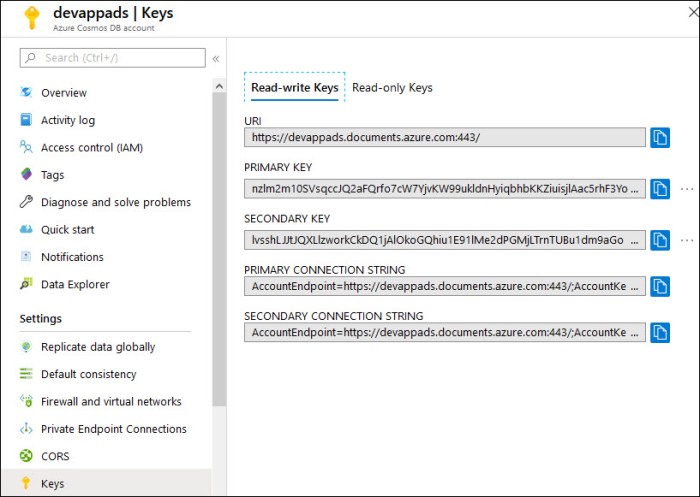
As you can see, there are separate keys for read-write and read-only.
The constructor code is as follows:
protected DataContext(string endpointUrl, string databaseId,
                      string masterKey)
{
    var client = new CosmosClientBuilder(endpointUrl, masterKey).Build();

    _container = client.GetDatabase(databaseId)
                       .GetContainer(this.ContainerId);
}
This constructor first creates the CosmosClient by using the CosmosClientBuilder. Then it gets the Container by id (name) as set in the ContainerId abstract property.
UpsertItemAsync
In Cosmos DB, you don’t insert or update a document, that is done in just one method called UpsertItemAsync.
public async Task<T> UpsertItemAsync(T item)
{
    Encapsulation.TryValidateParam<ArgumentNullException>(item != null,
                                                          nameof(item));

    var result = await this._container.UpsertItemAsync<T>(item);

    return result.Resource;
}
The result of UpsertItemAsync is ItemResponse. This object has some pretty interesting data in the Diagnostics property. Some of the data includes start time, elapsed time, regions contacted, status code, request charge and more.
RetrieveItemAsync
Retrieving a single document is easy too and looks like this:
public async Task<T> RetrieveItemAsync(string id)
{
    Encapsulation.TryValidateParam(id, nameof(id));

    var response = await this._container.ReadItemAsync<T>(id,
                                         new PartitionKey(id));

    return response.Resource;
}
I also added methods to the DataContext class to retrieve all documents in a container and another that retrieves all documents based on a predicate.
public IEnumerable<T> RetrieveAllItems()
{
    var result = this._container.GetItemLinqQueryable<T>(
                   allowSynchronousQueryExecution:true);

    return result.ToList();
}

public IEnumerable<T> RetrieveItems(Func<T, bool> predicate)
{
    Encapsulation.TryValidateParam<ArgumentNullException>(predicate != null,
                                                          nameof(predicate));

    var result = this._container.GetItemLinqQueryable<T>(
                                 allowSynchronousQueryExecution: true)
                                 .Where(predicate);

     return result.ToList(); ;
}
AdsDataContext
Each container in this design will use the DataContext class. To do that, all I must do is inherit DataContext and then set the ContainerId as shown below.
public class AdsDataContext: DataContext<Ad>
{
    public AdsDataContext(string endpointUrl, string databaseId,
                          string masterKey) : base(endpointUrl,
                          databaseId, masterKey)
{ }

    public override string ContainerId => "Ads";
}
From here I can easily add custom methods to retrieve and save data. For now, this is all I need to get my unit tests working. To upsert a document, I create the AdClick object and send it to the database like this:
var result = await _adClicksDbContext.UpsertItemAsync(adClick);
To retrieve a document, all I need is its id and call the method below:
var ad = await _adsDbContext.RetrieveItemAsync("4baca6f3-8446-4729-b587-5e015f8ff22d");
Summary
I hope this shows how easy it is to create and use Azure Cosmos DB. Since I come from a relational database background, I still have a lot of learning to do. Since I do come from that world, I can see how using a database like Cosmos DB is very useful and flexible. I also see where using a database like SQL Server might work out better for other projects. Both have their places.
Before You Start Using Cosmos DB
If you come from a relational database as I do, I highly recommend getting some training first. Relational databases and document databases don’t have much in common and you will have a learning curve. I have done some training and read a lot to get this article completed, but I still have a lot of learning to do.
Since the learning curve for myself was high, I almost gave up and went back to SQL Server with Entity Framework (since I can do that quickly). But I wanted to learn Cosmos DB, so I kept going with the help of some Microsoft Azure MVP’s. Since Cosmos DB is relatively new, I would not recommend purchasing books on it since it still has a lot of changes going on.
I would like to thank Azure MVP’s Sam Cogan and Vishwas Lele for helping me with the original article and Mark Brown from the Microsoft Cosmos DB team for helping with this article.
Resources
- Build apps for free with Azure Cosmos DB Free Tier: https://devblogs.microsoft.com/cosmosdb/build-apps-for-free-with-azure-cosmos-db-free-tier/
- Data modeling for lower latency with Azure Cosmos DB: https://www.youtube.com/watch?v=lwjDKAZukOk
- Introduction to Cosmos DB: https://docs.microsoft.com/en-us/azure/cosmos-db/introduction
- Learning Azure Cosmos DB: https://www.pluralsight.com/courses/azure-cosmos-db. If you are new to Cosmos DB or document databases, I highly recommend watching this course on Pluralsight (you can get a trial account if you don’t have one).
- Modeling data and best practices for the Azure Cosmos DB SQL API: https://youtu.be/nlVnDpJhmV4
- Videos on Channel 9: https://channel9.msdn.com/Search?term=cosmos%20db
- Utility Dev App: http://bit.ly/DevUtility. This is the app I will be connecting to this cloud solution at the end of this series. I hope you will check it out.
Next Article
In the next article, I code the business layer that includes using Azure Queues. Click here to read this article.
